Showing posts with label Week 13. Show all posts

Saturday, October 27, 2012

Pumpkin Monkey Bread

My last Fall food recipe for this week of Fall foods is for Pumpkin Monkey Bread. I made this bread for a Halloween play date and it was a huge hit. I loved it a little too much, at least that's what my scale tells me.

Here is the Pinterest Pin for this amazing delight. (From this blog)

Pumpkin Money Bread
For the dough:
- 3 1/4 cups of flour (you might need a little extra for kneading)
- 1/2 tsp of salt
- 1/2 tsp of cinnamon
- 1/4 tsp of nutmeg
- 1/8 tsp of cloves
- 2 Tbsp of unsalted butter (melted)
- 1/2 cup of warm milk
- 1/4 cup of warm water
- 2/3 cup of pumpkin puree
- 1/4 cup of sugar
- 2 1/4 tsp of active dry yeast

For the coating:
- 1 cup of sugar
- 2 tsp of cinnamon
- 3/4 stick of butter (melted)

For the glaze:
- 2/3 cup of powdered sugar
- 2 Tbsp of pure maple syrup
- 2 tsp of milk

1. In a large mixing bowl, mix together the flour, salt, and spices.

2. Then in another large bowl, mix together milk, water, pumpkin, melted butter, sugar, and yeast.

3. Then add the wet ingredients to the center of the dry ingredients, stir (or mix with a standup mixer with the dough hook) until the dough comes together. Then knead on a lightly floured surface for 6 - 8 minutes (or just let the standup mixer do the work). 

4. Now cover the dough and let it rise for an hour. 

5. While rising, mix together the sugar, butter, and cinnamon for the coating. Also spray a bundt pan with cooking spray. 

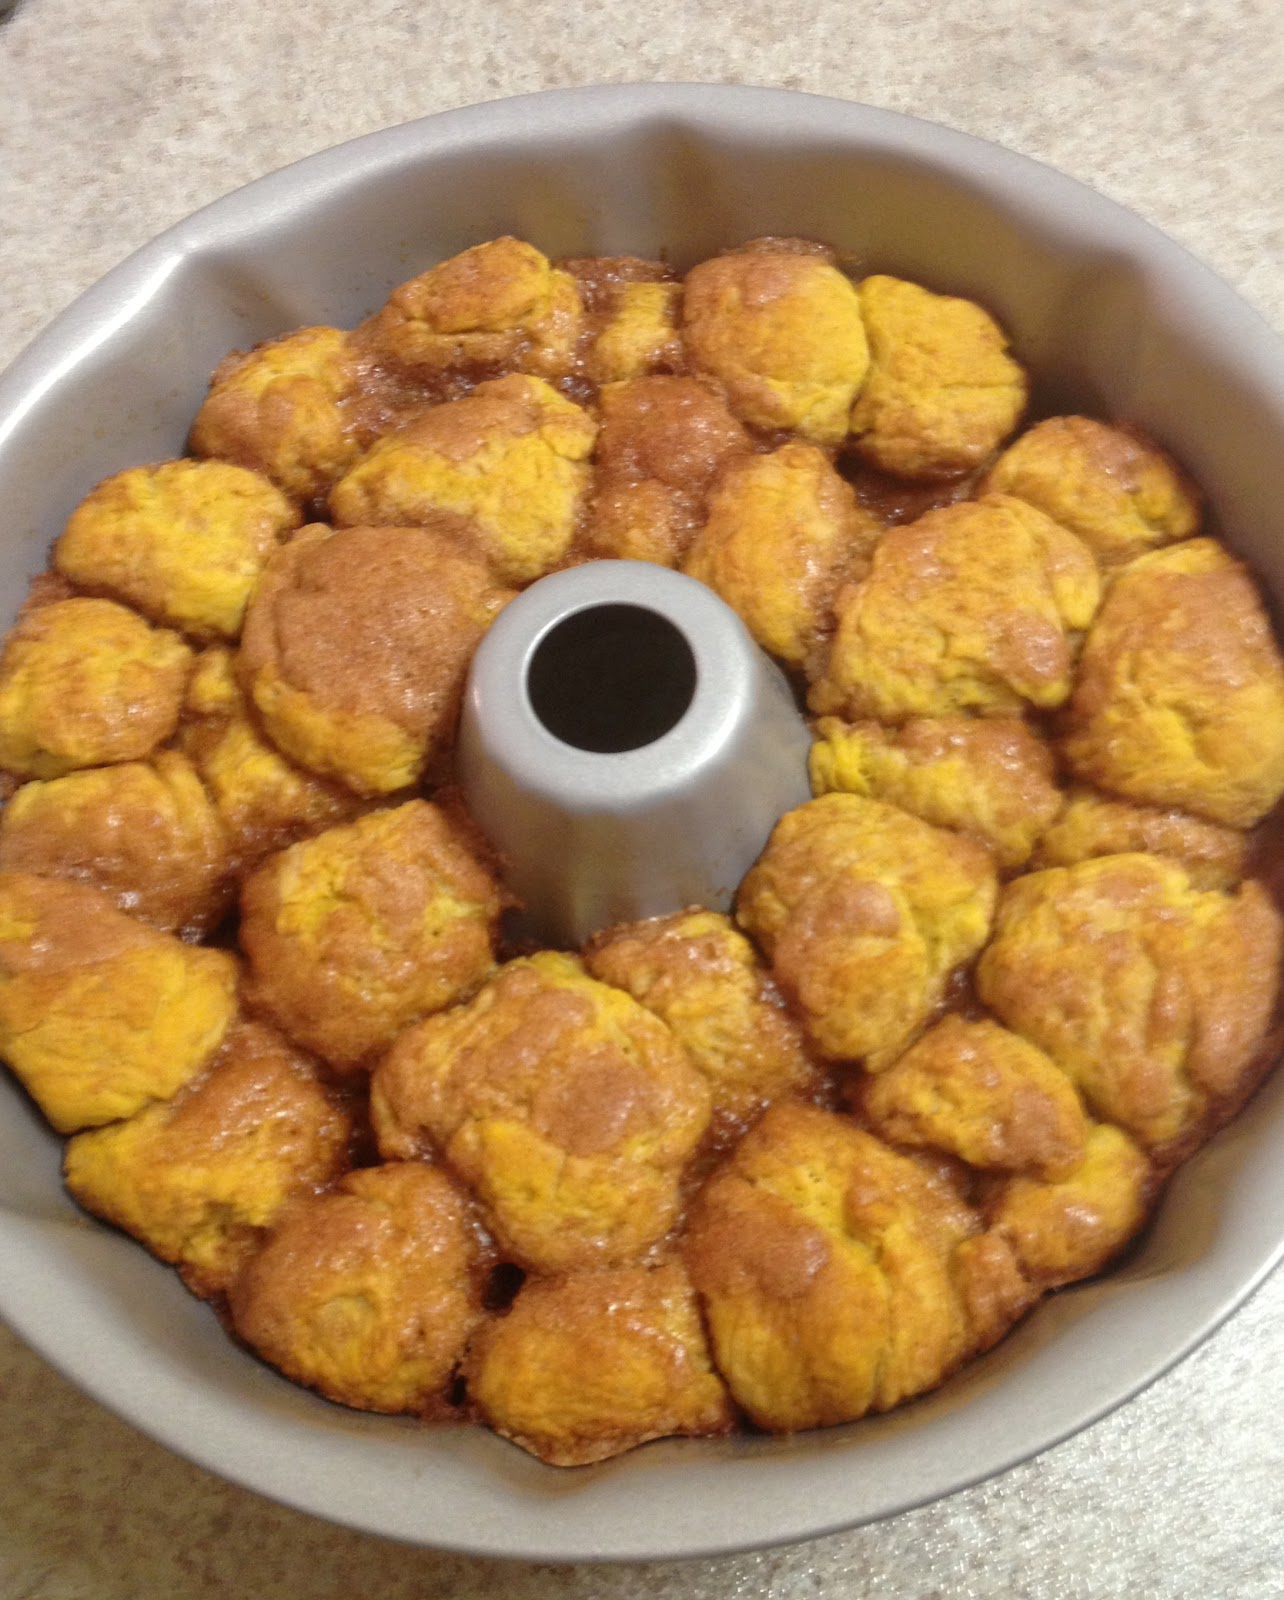
6. Once the dough is doubled in size, break off pieces of dough, then shape into a ball. Dip each ball in the coating and place equally around the bundt pan.

7. Once all the dough is in the pan, cover the bundt pan and let the dough rise again for another hour. 

8. Once the dough is done rising, preheat the oven to 350 degrees, and bake the bread until golden brown, 30 - 35 minutes. Let cool for 5 - 10 minutes before turning the bread onto a platter.

9. While cooling, mix together powdered sugar, milk, and maple syrup. Once it has cooled turn the bread onto a platter and add the maple glaze while it's still warm.

10. ENJOY!!!!!!

I have to say this is one of the best recipes I have found on Pinterest, but I'm impartial because I love me some carbs. This bread is so delicious, my mouth is watering just uploading these picture, I'm so sad it's all gone. :'(

This was a Pinterest Success! But a diet fail. 

Friday, October 26, 2012

Homemade Apple Cider

I was so, so, so, so excited to make Homemade Apple Cider. I LOVE Apple Cider. It is one of my top reasons that I love the Fall.

The Pinterest Pin for Homemade Apple Cider (See Blog Here)...
This might be the only Pinterest Pin picture that my pictures look better than. Although I wish I had this amazing glass.

This recipe is very easy, it's just very time consuming since you cook it in the slow cooker.

Homemade Apple Cider

- 12 Apples (I used a 3lb bag of macintosh apples, there were 13 apples)
- 4-7 cups of water (I used about 7 cups)
- 1/2 - 3/4 of Sugar (optional) (I used a little more than a half a cup)
- 1 tbsp of Cinnamon (I added more later)
- 1 tsp of All Spice (I added more later)

1. Core Apples and cut into quarters. I just used an apple slicer.
2. Place apples, spices, sugar and water in the slow cooker. Add enough water to cover the apples. This is a little tricky since apples float.

3. Cook apples in the slow cooker for 5 - 6 hours on low. After 5 hours I tasted my cider and it didn't taste very appley, so I decided to put the apples through the food processor, and let the cider cook on high for 1 more hour. I don't recommend this, it will make the final draining process much harder than needed. And it looks pretty gross.
7. Once it's done cooking, put the cider through a cheese cloth and a metal sieve. I did them at the same time, to save time.
8. Then you can take the cheese cloth and squeeze out any extra liquid. 

9. Next you will take the liquid that has been drained and put it through a mesh sieve. My process would have been quicker if I had a bigger sieve, and probably much quicker if I didn't puree the apples.
10. Once all the liquid is through the mesh sieve, you might want to do it one more time. After all that time and all that work, this is the fruit of your labor. Not very much.
11. Enjoy chilled or warm. I prefer it warmed.

This was seriously the best Apple Cider I have ever had, it was just a lot of work. So it was definitely a Pinterest Success, but I might just stick to the store bought Apple Cider.

Since I had all that pureed apple, I thought I would try another Pinterest Pin. This one was for homemade fruit roll ups made with fruit puree. (See here)
Since I already cooked the fruit and pureed it, all I had to do was spray a cookie sheet and then add the puree mix.
Then I put it in the oven for 5-8 hours on the lowest temperature (mine was 170 degrees) and I cracked the door. This will dry out the fruit and it will look something like this. (I think I could have dried them out a little less.)
 Then you can cut the fruit with a pizza cutter and wrap it in wax paper to serve.
They don't look very appealing, but they are actually really good, and my toddler loves them. So any way to get a toddler to eat fruit is great to me. Pinterest Success! 

Pumpkin Cream Cheese Bars

This week I have been busy in the kitchen, preparing some of the best Fall Foods. The first recipe I made was Pumpkin Cream Cheese Bars. They are aren't too fattening of a treat to indulge in.

The Pinterest Pin linked to this blog. Go here. The writer said she whipped up this dessert in a pinch with ingredients out of what was in her pantry and refrigerator. I say that is very crafty, I wouldn't have the first idea of things to "throw" together in a pinch. I need direction.

Pumpkin Cream Cheese Bars
Random ingredients:
-1 Box of Angel Food Cake Mix (One Step Kind, basically the box says just add water)
-1 can of Pumpkin Puree (15oz)
-3/4 water
-1/2 tsp Cinnamon
-1 8oz package of Cheese Cheese

1. Mix together the cake mix, pumpkin puree, water and cinnamon. 
2. Separately mix cream cheese with a couple tablespoons of water to make it smooth and thinned out. 
3. Grease a baking dish.
4. Fill the baking dish with HALF of the pumpkin\cake mix, and HALF of the cream cheese mix. 
5. Run a knife through the mix, making figure 8's for a fancy design. 
6. Then put the rest of the pumpkin\cake mix in the baking dish and the rest of the cream cheese mix. 
7. Again run a knife through the mix, making figure 8's for a fancy design. 
8. Bake for 35 minutes on 375 degrees, or until a toothpick comes out clean.
9. Let cool for a few minutes, then cut and enjoy. 

I did add some more cinnamon to the top of mine and swirled it in. I am not the biggest fan of angel food cake, so I did not love these bars. But my husband and friends said they were pretty good. So I'll say it was a Pinterest Success for them. 

Sunday, October 21, 2012

Week 13 Theme...

Ahhh, I love Fall! I love the smells, the colors, the Holidays, the weather, the food!

Fall is all about the food! We have Halloween Treats and a Thanksgiving feast. If Fall isn't all about the delicious food, then I have been wildly misguided. Because just the word Fall makes me hungry.

This week I am going to indulge in Fall Foods. I am going to try some Pumpkin recipes, and I'm so excited about trying to make homemade Apple Cider. Yummy! My mouth is watering just thinking about it. I am looking forward to pigging out.