Sunday, October 28, 2012

Week 14 Theme...

This week happens to be the week of Halloween. So the theme of this week is going to be my Halloween Costume.

I have found the most amazing costume on Pinterest to make, and I can't wait to walk around my neighborhood and Trick or Treat. Good thing I have a kid or they might tell me I'm a little too old to be trick or treating.

Be sure to check back this week for my amazing costume.

HAPPY HALLOWEEN! 

Saturday, October 27, 2012

Pumpkin Monkey Bread

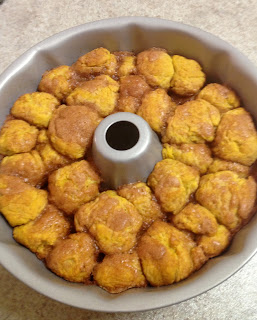
My last Fall food recipe for this week of Fall foods is for Pumpkin Monkey Bread. I made this bread for a Halloween play date and it was a huge hit. I loved it a little too much, at least that's what my scale tells me.

Here is the Pinterest Pin for this amazing delight. (From this blog)

Pumpkin Money Bread
For the dough:
- 3 1/4 cups of flour (you might need a little extra for kneading)
- 1/2 tsp of salt
- 1/2 tsp of cinnamon
- 1/4 tsp of nutmeg
- 1/8 tsp of cloves
- 2 Tbsp of unsalted butter (melted)
- 1/2 cup of warm milk
- 1/4 cup of warm water
- 2/3 cup of pumpkin puree
- 1/4 cup of sugar
- 2 1/4 tsp of active dry yeast

For the coating:
- 1 cup of sugar
- 2 tsp of cinnamon
- 3/4 stick of butter (melted)

For the glaze:
- 2/3 cup of powdered sugar
- 2 Tbsp of pure maple syrup
- 2 tsp of milk

1. In a large mixing bowl, mix together the flour, salt, and spices.

2. Then in another large bowl, mix together milk, water, pumpkin, melted butter, sugar, and yeast.

3. Then add the wet ingredients to the center of the dry ingredients, stir (or mix with a standup mixer with the dough hook) until the dough comes together. Then knead on a lightly floured surface for 6 - 8 minutes (or just let the standup mixer do the work). 

4. Now cover the dough and let it rise for an hour. 

5. While rising, mix together the sugar, butter, and cinnamon for the coating. Also spray a bundt pan with cooking spray. 

6. Once the dough is doubled in size, break off pieces of dough, then shape into a ball. Dip each ball in the coating and place equally around the bundt pan.

7. Once all the dough is in the pan, cover the bundt pan and let the dough rise again for another hour. 

8. Once the dough is done rising, preheat the oven to 350 degrees, and bake the bread until golden brown, 30 - 35 minutes. Let cool for 5 - 10 minutes before turning the bread onto a platter.

9. While cooling, mix together powdered sugar, milk, and maple syrup. Once it has cooled turn the bread onto a platter and add the maple glaze while it's still warm.

10. ENJOY!!!!!!

I have to say this is one of the best recipes I have found on Pinterest, but I'm impartial because I love me some carbs. This bread is so delicious, my mouth is watering just uploading these picture, I'm so sad it's all gone. :'(

This was a Pinterest Success! But a diet fail. 

Friday, October 26, 2012

Homemade Apple Cider

I was so, so, so, so excited to make Homemade Apple Cider. I LOVE Apple Cider. It is one of my top reasons that I love the Fall.

The Pinterest Pin for Homemade Apple Cider (See Blog Here)...
This might be the only Pinterest Pin picture that my pictures look better than. Although I wish I had this amazing glass.

This recipe is very easy, it's just very time consuming since you cook it in the slow cooker.

Homemade Apple Cider

- 12 Apples (I used a 3lb bag of macintosh apples, there were 13 apples)
- 4-7 cups of water (I used about 7 cups)
- 1/2 - 3/4 of Sugar (optional) (I used a little more than a half a cup)
- 1 tbsp of Cinnamon (I added more later)
- 1 tsp of All Spice (I added more later)

1. Core Apples and cut into quarters. I just used an apple slicer.
2. Place apples, spices, sugar and water in the slow cooker. Add enough water to cover the apples. This is a little tricky since apples float.

3. Cook apples in the slow cooker for 5 - 6 hours on low. After 5 hours I tasted my cider and it didn't taste very appley, so I decided to put the apples through the food processor, and let the cider cook on high for 1 more hour. I don't recommend this, it will make the final draining process much harder than needed. And it looks pretty gross.
7. Once it's done cooking, put the cider through a cheese cloth and a metal sieve. I did them at the same time, to save time.
8. Then you can take the cheese cloth and squeeze out any extra liquid. 

9. Next you will take the liquid that has been drained and put it through a mesh sieve. My process would have been quicker if I had a bigger sieve, and probably much quicker if I didn't puree the apples.
10. Once all the liquid is through the mesh sieve, you might want to do it one more time. After all that time and all that work, this is the fruit of your labor. Not very much.
11. Enjoy chilled or warm. I prefer it warmed.

This was seriously the best Apple Cider I have ever had, it was just a lot of work. So it was definitely a Pinterest Success, but I might just stick to the store bought Apple Cider.

Since I had all that pureed apple, I thought I would try another Pinterest Pin. This one was for homemade fruit roll ups made with fruit puree. (See here)
Since I already cooked the fruit and pureed it, all I had to do was spray a cookie sheet and then add the puree mix.
Then I put it in the oven for 5-8 hours on the lowest temperature (mine was 170 degrees) and I cracked the door. This will dry out the fruit and it will look something like this. (I think I could have dried them out a little less.)
 Then you can cut the fruit with a pizza cutter and wrap it in wax paper to serve.
They don't look very appealing, but they are actually really good, and my toddler loves them. So any way to get a toddler to eat fruit is great to me. Pinterest Success! 

Pumpkin Cream Cheese Bars

This week I have been busy in the kitchen, preparing some of the best Fall Foods. The first recipe I made was Pumpkin Cream Cheese Bars. They are aren't too fattening of a treat to indulge in.

The Pinterest Pin linked to this blog. Go here. The writer said she whipped up this dessert in a pinch with ingredients out of what was in her pantry and refrigerator. I say that is very crafty, I wouldn't have the first idea of things to "throw" together in a pinch. I need direction.

Pumpkin Cream Cheese Bars
Random ingredients:
-1 Box of Angel Food Cake Mix (One Step Kind, basically the box says just add water)
-1 can of Pumpkin Puree (15oz)
-3/4 water
-1/2 tsp Cinnamon
-1 8oz package of Cheese Cheese

1. Mix together the cake mix, pumpkin puree, water and cinnamon. 
2. Separately mix cream cheese with a couple tablespoons of water to make it smooth and thinned out. 
3. Grease a baking dish.
4. Fill the baking dish with HALF of the pumpkin\cake mix, and HALF of the cream cheese mix. 
5. Run a knife through the mix, making figure 8's for a fancy design. 
6. Then put the rest of the pumpkin\cake mix in the baking dish and the rest of the cream cheese mix. 
7. Again run a knife through the mix, making figure 8's for a fancy design. 
8. Bake for 35 minutes on 375 degrees, or until a toothpick comes out clean.
9. Let cool for a few minutes, then cut and enjoy. 

I did add some more cinnamon to the top of mine and swirled it in. I am not the biggest fan of angel food cake, so I did not love these bars. But my husband and friends said they were pretty good. So I'll say it was a Pinterest Success for them. 

Sunday, October 21, 2012

Week 13 Theme...

Ahhh, I love Fall! I love the smells, the colors, the Holidays, the weather, the food!

Fall is all about the food! We have Halloween Treats and a Thanksgiving feast. If Fall isn't all about the delicious food, then I have been wildly misguided. Because just the word Fall makes me hungry.

This week I am going to indulge in Fall Foods. I am going to try some Pumpkin recipes, and I'm so excited about trying to make homemade Apple Cider. Yummy! My mouth is watering just thinking about it. I am looking forward to pigging out.

Thursday, October 18, 2012

Tire Swing Tutorial

Since Fall weather has been getting my family to enjoy the great outdoors, we thought it would be a great time of year to put up a tire swing. Every kid needs one! Although I think my husband and I enjoy it more than our two year old. 

I found a few Pinterest Pins on making a tire swing. This pin literally has all the information in the picture.
With my husband's help, we deviated from this tutorial a bit. Here is my step-by-step guide on how we built our tire swing.

Tire Swing (made with Rope)
Materials:

- 1 Tire [we used an old tire from when we replaced our tires, 16" ] - Saved $3.00 for disposal fee
- 1 Hollow Braid Poly Rope [50 FT, 215 lb safety load] - $6.48 from Lowe's
- 3 Stainless Steel Eye Bolts [5/16" x 3 1/4"] - $1.88 each from Lowe's
- 3 Fender Washers [5/16" X 1 1/4"] - $1.15 for a pack of 4 from Lowe's
- 1 Stainless Steel Quick Link [5/16"] - $6.94 from Lowe's
- Drill with a 5/16" drill bit
- Scissors or Box Cutter
- Ladder

This entire project cost about $20.00 (less if you count the savings in the tire disposal fee). Some of the pieces are a little more pricey because we went with all stainless steel. Since we live in Florida and it rains a lot here, we didn't want the metal pieces to rust.

1. The first step is to drill three holes in the top of the tire, equally apart. We just eye balled it, but you could meaure it out. Also (not pictured) drill holes on the bottom side of the tire so that when it rains the water will drain out, we drilled 6 holes.

2. Next you will put an eye bolt in each hole. Then on the underside you will put on the washer and then screw on the bolt.
 This is how the bolt assembly will look on the underside.
3. Now that all your bolts are in place, cut three equal pieces of rope (5' - 8' feet, how ever long your preference is). I cut at about 5' but once you tie the knots on each end it length up being about 3' long, and I wished I had about 1 more foot.

4. Next you are going to use the cut rope to tie an overhand loop through each of the eye bolts. Here is what it will look like.
In case you don't know how to tie an overhand loop, here is a tutorial. Basically it is a regular knot, but with the rope doubled. Make sure you put the rope through the eye bolt before tying. 
5. Now you will tie an overhand loop at the top of each of the rope pieces. So you will have 3 separate loops. Then you put those loops through the Quick Link.
6. Here comes the part where you might need some brawn. Now you will tie the remaining rope to the tree. We did an overhand loop, looped the rope around the tree, then put the rope through the loop. Since we have a younger tree, we used two branches to secure it to the tree. Less stress on the branches. 

7. Next you will cut the rope at the desired level to attach to the swing (leaving a little extra for your overhand loop). Then tie your overhand loop at the end, and add the loop to your Quick Link. It will look something like this. 
8. Now your swing is ready to enjoy. And you are that fun house that has a tire swing in your yard. :)

With my husbands help, this project was really easy. I probably would have died trying to get out of the tree, so thank God for him. The entire project probably took us about 30 minutes, we probably would have been done in 10 if we were better at tying knots, it took us a few tries. But now we are knot tying experts. This was a Pinterest Success, even if we didn't follow all of the directions of the pin. 

Sunday, October 14, 2012

Week 12 Theme...

With temperatures dipping into the frigid lows of the 60's in sunny Florida, it feels like Fall is in the air. We have had some beautiful days lately. The family and I have spent a lot of time outside. I thought a great Pinterest Pin for this week would be something fun for the outdoors.

We recently had my son, Xander's birthday and we used tires as decorations. We ended up holding on to one tire, and I am so glad that we did. For this week's Pinterest Challenge, I (with help from my husband) am going to make Xander a tire swing.

I had always wanted to have a house with a tire swing, so I am really excited about this Pin. I mean even if Xander doesn't like it, I'm pretty sure I will love it!

Saturday, October 13, 2012

DYI Reusable Fabric Softener Dry Sheets

My last pin for this week of Laundry Fun Pins, was to try out this Pinterest Pin for do-it-yourself reusable fabric softener dry sheets. Found here. This Pin says that this works as good as a dryer sheet, with less waste.
The directions are really simple. You fill up a spray bottle (I reused a Windex Bottle) with one cup of Fabric Softener and the rest with water. Spray about 3 - 4 sprays on a clean rag and throw it in your dryer. And no static and nicer smelling laundry.
I was a little weary that this might not work, so I spritz the rug about 10 times. And I am going to call this a Pinterest half Success, half Fail. I don't think there was much static, but I also don't think that my laundry smelt any more fresh than not using it. The Pinterest Pin never said it was going to smell any nicer, but when I use a dryer sheet, my laundry smells very fresh. I think maybe with a few more spritzes this might be a little more fragrant. So I'll call this one a draw.

Thursday, October 11, 2012

Homemade Laundry Detergent

A few weeks ago I stated I am not a granola person. With my new found love of cleaning with vinegar, and now making my own laundry detergent, I feel it's getting a little crunchy up in here. 

I still like to believe it's not because I'm granola, it's because I'm cheap. I mean how can you not at least be a little interested it a laundry detergent recipe that works out to be less than a penny a load? See now I have your attention. 

Since I have started using Pinterest I have seen pin after pin about this laundry detergent recipe. So I figured I would give it a shot. Here is the Pin that I followed, there are many more that all have the same recipe. You can see their recipe post here.
The laundry detergent recipe is good for both top and front loader washing machines. This recipe will yield 10 gallons of detergent, but you will only have to store 5 gallons.

Step By Step Directions for Homemade Laundry Detergent:

Materials you will need to purchase -
- Arm & Hammer Washing Soda (Different than Baking Soda) - $3.24 at Wal-mart
- Borax - $3.38 at Wal-mart
- Fels-Naptha Soap Bar - $0.97 at Wal-mart
- 5 Gallon Bucket with Lid - $4.05 at Lowe's
- [Optional] Essential Oil

The first step is to use a cheese grater and grate the entire bar of Fels-Naptha Soap into a saucepan.
Then add 4 cups of hot tap water into the saucepan, stirring continuously over medium-low heat until the entire bar of soap is melted.
Next, fill the 5 gallon bucket up halfway with hot tap water. Then add in the melted soap, and 1 cup of the Arm & Hammer Washing Soda and 1/2 cup of Borax. Once all the ingredients are in the bucket, mix until all the powders are dissolved. I have this handy tool mixer, but a long stick or mixing spoon would work too.
Once it is thoroughly mixed, fill the rest of the bucket with hot tap water and mix again. Once complete, place the lid on and store somewhere out of the way overnight so the mixture can gel.

The next day or when you are ready to use it, stir up the bucket and then take the detergent and fill up a used laundry detergent container half way (these containers are heavier plastics than say a milk jug, which will break down over time). Then fill up the remaining half with water. [This is also when you would add the essential oil: 5 - 7 drops of oil per gallon.]
Now you are ready to do laundry! You will want to shake the mixture every time before you use it, it will be a gel\slushy mixture when you use it. [Note: the detergent won't suds up when you use it like regular detergent]

The recipe yields 10 gallons.
A Top Load Machine will use about 5/8 cup to 1 cup per load (Approx. 180 loads, about $0.01 a load)
A Front Load Machine will use about 1/4 cup per load (Approx. 640 loads, about $0.0025 a load)

You use such a small amount of the washing soap and borax that you will have enough to make many more batches of this recipe. The biggest expense is the Fels-Naptha Soap Bar for $0.97 that you have to buy each time you make a new batch.

I have to say after doing a few loads of laundry with this detergent I am sold. My whites are whiter, and even though I didn't add essential oil, my clothes smell very clean. This is definitely a Pinterest Success, I would say another life success!

Tuesday, October 9, 2012

How to Clean Your Washing Machine

Cleaning the washing machine seems a little repetitive, right? I mean every time you run the washing machine, isn't it washing the machine as well? This is what I thought until I tried this Pinterest Pin.
The Pinterest pin leads to this blog here, there is also a tutorial for cleaning a Front-Loader washing machine, found here.

Cleaning the machine is really simple, it just requires a lot of waiting. So do this on a day that you plan to be home for a few hours. All you need to "clean the machine" is bleach, vinegar, something to measure out a quart of each, and like I said, time.
Steps To Clean and Disinfect your Top Loading Washing Machine:
1. Fill the machine up with Hot water. 
2. Add 1 quart of bleach. 
3. Once the machine is full, let it agitate for about a minute or so. 
4. Stop the cycle and let the water sit for 1 hour.
5. Once the hour is up, let the machine run through it's longest cycle. 
6. The minute it is complete, start adding the hot water again.
7. Add 1 quart of vinegar. 
8. Once the machine is full, let it agitate for about a minute or so. 
9. Stop the cycle and let the water sit for 1 hour. (At this time you can dip a rag in the machine and use the vinegar water to wash all the nooks and crannies of the machine)
10. Once the hour is up, let the machine run through it's longest cycle.  

That is all. Easy, but time consuming. The first cycle with the bleach will disinfect the machine, the hose, and the pipes that it runs through. The bleach will also remove any stains in the machine. The vinegar cycle is where you will see all the magic. After the hour is up you will see all the nasty build up your machine has been storing. Pretty gross, but I guess I am glad it showed something or this might have been a bust. Here is a picture of the Chapman family buildup. 
So while I thought this was going to be a Pinterest Fail, especially after the first bleach cycle and my water amazingly clean. After the vinegar cycle the Pinterest Pin proved to be a gross, nasty Success. 

Sunday, October 7, 2012

Week 11 Theme...

Now that I have revealed the laundry room renovation, I thought a great segue for this week would be laundry pins.

I am going to try this famous homemade, all natural laundry detergent that everyone and their mother seem to be pinning on Pinterest. The detergent is suppose to work in top loaders and high efficiency washers as well. This detergent will bring the cost of doing laundry to under a penny per load. That just seems ludicrous, but I have high hopes for this recipe.

Another Pinterest Pin I am going to try is DIY reusable fabric softener dryer sheets. I always forget to throw in a dryer sheet, so this Pinterest Pin might not make it past this week.

Lastly,  I have an old fashion top loader washing machine, and I am going to try a laundry Pinterest Pin to get it super clean. I feel like a washer machine is a self cleaner, so I'm not sure how well this will really work. But I guess it's worth a shot to see if my machine is carrying extra build up.

This week is going to be a fun and exciting week of doing laundry! Yay!!!! <-sarcasm :P

Friday, October 5, 2012

Laundry Room Renovation

When I first started my Pinterest Challenge and started going heavy on the re-pinning on Pinterest, I saw a beautiful laundry room. It was simple yet didn't look like a utility room. When we come home we come through the garage and the first room we enter is the laundry room. So I wanted it to feel a little more inviting and not like an extension to the garage.

Here is my Pinterest Inspiration for my laundry room:
This is what I was working with in my home:

My laundry room wasn't horrible, when we painted it a few years ago, it made a world of a difference. I still think it had that utility look, and mainly I blame that wire shelf. So we went for a new look in our laundry room thanks to Pinterest.
The cabinets were the big game changer in this room. We picked them up at Home Depot for $42.00 each, we bought 3. So the total for the cabinets were $126.00. Another addition is the shelf. I went on a world wide search to find shelves. After a long search they came out amazing and fairly inexpensive. 
The brackets are from Ikea. The end two brackets are 7 1/2" aluminum brackets for $10.00 and the middle one was a 7 1/2" aluminum connecter bracket for $5.00. The actual shelf was about $7.00 from Home Depot. It was the perfect length and perfect width, it just needed to be cut in half and painted. The Ikea brackets had a screw like piece underneath the brackets to adjust to the shelf thickness, so no need to buy Ikea shelves for $19.99 a pop (we would have needed two). So the total price for the shelf was about $22.00.

Now for the accessories on the shelf. The pots and fake grass are from Ikea. The pots were $0.79 each and the grass was $3.99 each. The glass jars and frames were also from Ikea. The glass jars were $3.99 each and the frames were a steal at $1.99 each. The clothespins in the jar were from Target all for $1.69. The pictures in the frames are actually scrapbook paper and that was $0.20 at Michaels.  The complete total for all the accessories was $23.41.

Another Pinterest Pin that I incorporated into the laundry room was actually the first Pin I ever pinned on Pinterest. Way before the birth of the Pinterest Challenge I pinned some Christmas Pins last year. The Pin is a picture frame, decorated, so you can give a dry erase To Do list as a gift. 
I always wanted to try this out. So I purchased a frame at Ikea for about $9.99 and put scrapbook paper as the backing (I bought two for $0.20 each) and now we have a function dry erase board on our way out the door.  Also the key rack is from Target and it was $6.99.
We did decide to upgrade our laundry hamper, it was from Target for a whopping $44.99. I thought that was crazy ridiculous. But it did look much better than the PVC hamper. And we added a drying rack since I lost the ability to hang up clothes. The only good thing about a wire rack. I can't seem to find the rack on Ikea's website, but it was $19.99. 
This project took about two weeks to complete. And the grand total was about $250.00. Not a cheap project but a definite Pinterest Success!