September has been a month of toddler fun. At the end of week 8, we have a huge birthday bash planned. This week will be dedicated to pre-party birthday planning fun.
The theme for Xander's 2nd birthday party is Disney Pixar Cars. Usually I am not the biggest fan of "character" themed birthday parties. Mostly because there is too much generic decorations, party supplies, and favors. Thanks to Pinterest there was no need to buy any generic hoopla. There are so many great ideas that are handmade and still have the feel for the characters and movie.
I always thought I had a creative gene when it came to party planning, thanks to my mom. But Pinterest really puts me to shame. I have to give my mom major kudos, she planned the best parties WITHOUT Pinterest, even without the internet!
I'm excited to share some of the birthday party projects I have been working on for this big day.

Sunday, September 16, 2012

Friday, September 14, 2012
Ikea Latt Makeover
With a toddler birthday quickly approaching, my time was short this week. I still found a little time to fit in my Pinterest Challenge project.


My goal was to take this table, the Ikea Latt, we got for our son for his birthday...

And transform it into less of an eye soar. These Pinterest Pins were my inspirations this week (Pinned courtesy from my friend Bridget Tanega)...


I actually took a little from each pin. From the first pin, I loved the idea of the bar with the baskets hanging off for art supplies. From the second pin, I loved the idea of a chalkboard top (at least I'm assuming it is chalkboard paint). And from the last pin, I loved the idea of staining it to match the room it was in.
Thanks to this week's Pinterest Pins, this is my final project:

The total cost of this project was about $35.00. The Ikea Latt table cost $19.99, the Ikea Bygel bar was $2.99, the Ikea Bygel containers are $0.99 each, the chalk board spray paint was $7.99 at Michael's (I used a 50% off coupon, making it $4.00), and the stain was about $4.00 at Home Depot (which I already had).
While working on this project and discussing it with my friend Bridget, we struck genius. I told her I needed to get sticky felt sliders for under the table so it wouldn't scratch the floor. Then she suggested to hot glue felt to the bottom of the table and chairs!!!! What a great and super cheap idea. A piece of white felt at Michael's is $0.20 (I had black felt on hand), and you can probably get about 100 felt squares out of one sheet. Genius! I will never pay $3.00 for a set of 8 sticky felt sliders again!

I absolutely love the way the table came out. I had a little trouble with the spray paint being uneven, but once it dries it was less noticeable. And I don't think this guy minds, he just loves his new table. I will chalk this up as a Pinterest Success.

Sunday, September 9, 2012
Week 7 Theme...
For this week's Pinterest Challenge, I have chosen to spice up a table we bought for Xander for his birthday.
We bought the Ikea Latt Children's table and two chairs. The set was $19.99 and the prefect size for a toddler. The problem with this very inexpensive table solution it leaves a little to be desired. It isn't very aesthetically pleasing.
We bought the Ikea Latt Children's table and two chairs. The set was $19.99 and the prefect size for a toddler. The problem with this very inexpensive table solution it leaves a little to be desired. It isn't very aesthetically pleasing.
I have found a few Pinspirations on how to make this table look great and to be awesome! Hopefully my attempt comes out just as good, maybe even better. :P
Friday, September 7, 2012
Toddler Photo Shoot
This week's theme has been based around my soon-to-be two years old, birthday boy, Xander. Last year when he turned one, we took him to get professional photo's done. This year I tried my luck with some Pinterest inspiration to save us money and have are own little photo shoot.
I did recently get the Canon 50mm f/1.8 lens for our DSLR Canon 60D. So whatever money was going to pay for a professional photo shoot this year went to my new lens. Bad Mommy. But I was pleasantly surprised by it's performance and picture quality.
I found a Pin that led to a blog that had 100 toddler photo shots. See here. This Pin helped me get a little creative with my photo shoot. The best pictures had great locations, so I knew just the place. We have a little lake by the house, so we set off to take some pictures.
I also love props in photos so I made a 3-D letter block of the number 2. Check it out here. And I purchased an empty picture frame from Walmart, for $3.87.
Out of 300+ pictures, here are a few of the gems I captured:
(All photo editing was done with a simple editor, free from Google called Piscasa)

This was the very first picture I took, and absolutely loved it. It reminded me of pictures from my grandfather. I added the sepia filter to really give it that 1940's feel.

He did pretty good with the props, too bad we couldn't get a smile.


Sometimes the best pictures are on accident. We were walking towards are next location, when I snapped this gem.

Frame on some twine with my photo assistant holding it up for me. Thanks Honey!

We had to break out the big guns and bribe him with Reese's Pieces. It did keep him participating longer.

The Pinspiration Pin had lots of kids feet and I thought it was super cute. So this is my artsy attempt at cute feet.

Poor guy just fell off the swing, but wanted to swing more. I love the emotion on his face.

These next few pictures I think are picture perfect. The lighting was amazing, the subject was corporative. Can't get much better than that.


This is hands down my favorite picture.


I did recently get the Canon 50mm f/1.8 lens for our DSLR Canon 60D. So whatever money was going to pay for a professional photo shoot this year went to my new lens. Bad Mommy. But I was pleasantly surprised by it's performance and picture quality.
I found a Pin that led to a blog that had 100 toddler photo shots. See here. This Pin helped me get a little creative with my photo shoot. The best pictures had great locations, so I knew just the place. We have a little lake by the house, so we set off to take some pictures.
I also love props in photos so I made a 3-D letter block of the number 2. Check it out here. And I purchased an empty picture frame from Walmart, for $3.87.
Out of 300+ pictures, here are a few of the gems I captured:
(All photo editing was done with a simple editor, free from Google called Piscasa)

This was the very first picture I took, and absolutely loved it. It reminded me of pictures from my grandfather. I added the sepia filter to really give it that 1940's feel.

He did pretty good with the props, too bad we couldn't get a smile.


Sometimes the best pictures are on accident. We were walking towards are next location, when I snapped this gem.

Frame on some twine with my photo assistant holding it up for me. Thanks Honey!

We had to break out the big guns and bribe him with Reese's Pieces. It did keep him participating longer.

The Pinspiration Pin had lots of kids feet and I thought it was super cute. So this is my artsy attempt at cute feet.

Poor guy just fell off the swing, but wanted to swing more. I love the emotion on his face.

These next few pictures I think are picture perfect. The lighting was amazing, the subject was corporative. Can't get much better than that.


This is hands down my favorite picture.


This week has been so much fun ramping up to celebrate the big 2. I may not be a professional, but I don't think I did too bad for an amateur. This Pinterest week was a success.
Wednesday, September 5, 2012
3-D Block Letters
This week I am going all out, photography style. I am pretending to be a professional for the week. I have a new lens and some filters for my DSLR, so I'm pretty sure that makes me a pro.
Every professional has photo props for their subject to sit in, stand on, hold, or just to be in the picture. I thought since I was doing a photo shoot for my soon-to-be-two toddler, I would make a block letter with the number 2 on it.
I found a Pinterest Pin on using cereal boxes to make 3-D block letters. The pin leads you to an easy tutorial. Click me.




Every professional has photo props for their subject to sit in, stand on, hold, or just to be in the picture. I thought since I was doing a photo shoot for my soon-to-be-two toddler, I would make a block letter with the number 2 on it.
I found a Pinterest Pin on using cereal boxes to make 3-D block letters. The pin leads you to an easy tutorial. Click me.

The supplies are cheap, in my case I had everything laying around the house. Free is for me!
Supplies:
-Empty Cereal Box
-Tape
-Scissors
-Pen\Sharpie
-Newspaper
-Elmer's Glue
-Water
-Flour
-Paint
1. The first step is to trace the letter\number on the cereal box. I used a piece of computer paper and printed out the number 2 in the font Arial. Then I cut out the number to trace. I am a much better tracer than free hander, but I usually suck at tracing too.


2. Next cut out the letter\number from the box (You will need to make two letters\numbers). Also cut out the sides of the cereal box to make the 3-D part of the block. I cut my sides in half vertically so that the blocks weren't too thick. Now tape the sides to the letter\number. Use long pieces of the cereal box to do the curves. Then tape, tape, tape.


3. Once all the sides are on, tape the second letter\number to the back side. You may need to trim the second letter\number so that they match up better. (Or I might have had to do that because of my mad tracing skillz)

4. Now it's time to paper mache this bad boy. To make the "goop" mix, you combine equal parts water, flour, and glue. This mixture will make the letter\number super sturdy and hard. I used about 4 teaspoons of each for my number, and I really caked it on there.
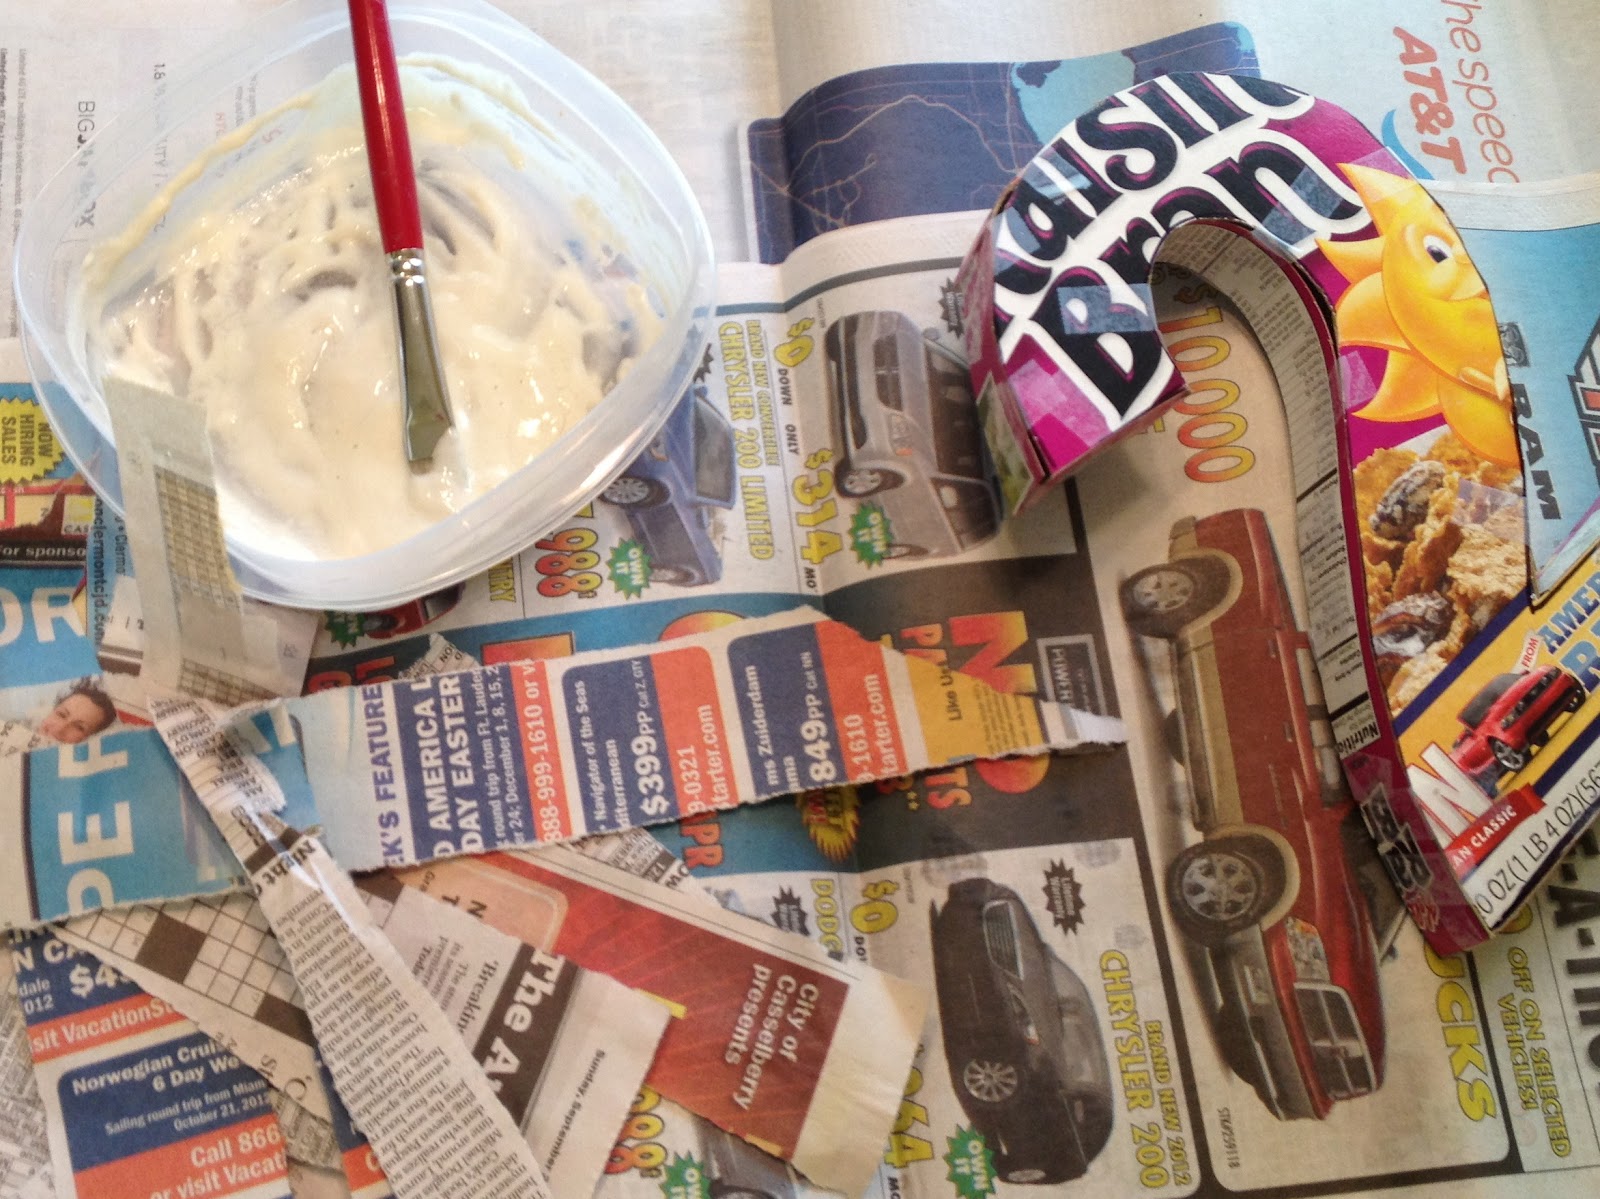
5. Paint the "goop" on a newspaper strip, put the strip on the letter\number, then paint on top of the strip to make sure you got it all. Once you have a layer or two covering the letter\number, it should look something like this. Beautiful!

6. Now comes the fun part. Wait for it to dry... This took a few hours, because I really loaded it with the "goop". Once it is dry, paint it anyway and any color you want. Actually you can only paint it blue.

7. Lastly, take amazing pictures of your creation and post it on your blog.

This pin was a Pinterest Success, now if only I can get my toddler to hold this while I snap a few photos of him, that should be fun.
Sunday, September 2, 2012
Week 6 Theme...
Week 6 happens to fall in the month of September, which is my son Xander's birth month. So for the next four week my weekly themes will be based around that guy.

Last week my wonderful husband, Paul, bought me the Canon 50mm f/1.8 lens for our DSLR Canon 60D. This lens is the cheapest of the 50mm lens'. But still cost just over a hundred dollars, which is super expensive in my book. Let's just say Christmas came early for me this year.

The 50mm is suppose to be a great lens for photo shoots. So this week I plan to have a mini photo shoot with my almost two year old. I am going to make a couple of photo props from Pinterest Pins and use a few Pinspiration photography techniques that I have also found.
Happy Birthmonth Xander! I look forward to this fun and creative month!
Saturday, September 1, 2012
Watermark T-Shirt
The final pin I tried this week was one for my little Disney lover. I found a great Pinsparation for making watermark T-shirts, so I though I would try my luck with a famous mouse for my toddler.
The original pin that caught my eye was a T-shirt with watermark quotes:

 - For my design, I printed out a coloring book page from online of Mickey Mouse to transfer onto the T-shirt. There are many possibilities to choose from. Just use google images and search for coloring book pages for any character you want, or you can freehand any design. I also taped Mickey to a piece of cardboard and covered it with plastic wrap (so the damp shirt didn't ruin the design).
 - Next you trace the outline or sketch the image you want on the T-shirt with Elmer's glue. Make sure you use the blue Elmer's glue; the tutorial stated that any other glue would NOT work.
 - Once the shirt is dry, it's time to dye it. Follow the directions on the dye box. Mine was to use one dye package for every 3 gallons. Since I used only about one gallon of water, I only used about 1/3 the package of dye. I mixed the dye mix with hot water, then added the shirt in the mix for 30 minutes. Stirring it every 10 minutes. Be sure to use protective gloves, and wear clothes that can get ruined if your dye splashes on you.

The original pin that caught my eye was a T-shirt with watermark quotes:

The pin links you to the tutorial for creating the T-shirt: Watermark Tee Tutorial. The tutorial is really easy to follow.
Watermark Tee:
Supplies:
- White T-shirt
- Blue Elmer's Glue
- Clothing Dye
- The first step is to prewash\rinse the fabric. You will want to add the design on the Tee while it is damp.
 - For my design, I printed out a coloring book page from online of Mickey Mouse to transfer onto the T-shirt. There are many possibilities to choose from. Just use google images and search for coloring book pages for any character you want, or you can freehand any design. I also taped Mickey to a piece of cardboard and covered it with plastic wrap (so the damp shirt didn't ruin the design).
 - Next you trace the outline or sketch the image you want on the T-shirt with Elmer's glue. Make sure you use the blue Elmer's glue; the tutorial stated that any other glue would NOT work.
- Make sure the T-shirt is completely dry before you continue to the next step. I set mine out in the sun on a very hot day for about an hour.
 - Once the shirt is dry, it's time to dye it. Follow the directions on the dye box. Mine was to use one dye package for every 3 gallons. Since I used only about one gallon of water, I only used about 1/3 the package of dye. I mixed the dye mix with hot water, then added the shirt in the mix for 30 minutes. Stirring it every 10 minutes. Be sure to use protective gloves, and wear clothes that can get ruined if your dye splashes on you.
- Last you rinse it in hot water until all the dye seems to be out, then rinse it in cold water. I just ran it through the washing machine, to make sure I got all the dye out. I obviously didn't wash anything else with it, or everything would have been red.
- Once it is all rinsed, it's time to dry, then enjoy.

I think mine came out OK, I think if I would have made the image a little bigger it would be a little clearer. I also think if I used a toothpick to even out the lines, there wouldn't have been so many "chunky" lines. I also probably should have used the entire package of dye so my toddler boy doesn't have to wear the color Salmon. Real men wear pink, Right?
I am going to call this one a Pinterest Success, just because I think the idea is amazing. I couldn't believe it worked so well. I blame myself for not having good tracing skillz. I always had a hard time staying in the lines.
Subscribe to:
Posts (Atom)